Gravimetry
Theory
Gravity surveys aim to derive a sub-surface model of density differences, based on the gravitational attraction of the underlying rock masses. From the inferred density differences, an interpretation in terms of lithology can be made.
Gravity measures the gravitational acceleration \(\vec{g}\) [m/s\(^2\)] of the Earth, in most cases the vertical component of the gravity vector, \(g_z\), with the help of a gravimeter. Gravimetry is a potential field method.
For further details, see script of lecture Angewandte Geophysik II from Georg Kaufmann.
Material properties
density \(\rho\) [kg/m\(^3\)],
defined as the ratio of mass \(m\) [kg] and volume \(V\) [m\(^3\)]:
\(\rho = \frac{\displaystyle m}{\displaystyle V}\)
Density as a macroscopic property depends on the density of the rock type, \(\rho_{rock}\) [kg/m\(^3\)], the density of the air-filled pore space, \(\rho_{air}\) [kg/m\(^3\)], and the density of the water-filled pore space, \(\rho_{infill}\) [kg/m\(^3\)]. Defining porosity \(\Phi\) [-] (0-no pores, 1-only pores) and water content \(\Theta\) [-] (0-no water, 1- only water), we arrive at:
\(\rho = \left[ \rho_{rock} (1-\Phi) + \rho_{air} \Phi (1-\Theta) + \rho_{infill} \Phi \Theta \right] \left[ 1 - \alpha T + \frac{\displaystyle P}{\displaystyle K_T} \right]\)
with \(T\) [C] temperature, \(P\) [Pa] pressure, \(\alpha\) [1/K] thermal expansion, and \(K_T\) [1/Pa] isothermal compression.
Instrument(s)
Scintrex CG6: The Scintrex CG-6 relative gravimeter uses a quartz sensor to measure the vertical component of the gravity field.
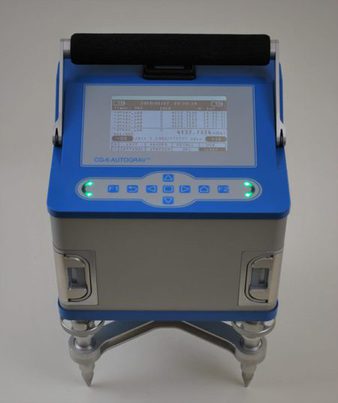
CG6, photo Scintrex
Assembly
Important: Handle with extreme care!
The CG-6 is ready to use. Note that the gravimeter is always on! While storage (in a save space), the gravimeter needs to be connected to the power supply (15V DC). This charges the two Lithium batteries, which are located in the two front slots of the unit.
The gravimeter should be stored on the tripod, and leveled to keep the sensor in a horizontal position.
For transport, use the soft case and transport the gravimeter with great care.
Configuration
Switching on: To check the status of the gravimeter, simply press the central key on the key pad, the screen should turn on. The status of the two lithium batteries can be seen on the top (left and right corners).
On the top line, date and time is also shown.
The second line shows a timer, the status of the gravimeter (should be idle), and the number of cycles for measuring.
The second block displays saved reading and below the horizontal line the current reading in mGal, togehter with standard error and standard deviation.
In the third block, the orientation of the gravimeter is indicated, both numerically (in arcsec), and graphically. The arrows indiate, in which direction the tripod screws need to be turned. The arrows become green, when the tilt threshold (currently set to 20 arcset) is reached.
The bottom block shows the menu.
LIST: Contains a pre-defined set of station names, which are stored in the file
stations.txtin the root-directory of the CG-6.RECORD: Starts the recording sequence for a station. Text changes from idle to recording. Do not touch instrument any more and wait for completion, shown again as idle.
RECALL: Recall the recorded stations.
USB: If CG-6 is connected to computer, activate to list the gravimeter hard disc as storage device on computer.
SETTINGS:
SYSTEM: System settings, leave untouched.
SURVEY: Enter survey name and operators before starting a new project. Choose station cycle as numeric and increment as 1. The points Cycles, Measure length, Record delay define, how often a measurement is repeated, how long a single measurement takes (in s), and after which time the measurement starts (in s). We usually choose 3 Cycles, a Measure lengthof 30s, and a Record delay of 5s.
CORRECT: Defines which corrections will be applied. The choice is Temperature, Drift, Tide, Level. We use Temperature and Level ON and Drift and Tide Off.
STATION: Manually define a station name.
GPS: Check status of GPS unit (searching, locked). Once the satellite lock is established, press synctime, then the correct date and time will be used from the GPS signal.
SLEEP: sleep mode, turn screen off.
Field measurement
During a gravity survey, survey points are measured either along pre-defined profiles or as irregular points in the field. At each point \(i\), several measurements need to be taken:
Geographical coordinates \((\phi,\theta)\) (as GPS point, e.g. with a hand-held GPS unit) as longitude \(\phi\) and latitude \(\theta\),
Elevation \(h_i\) [m] (from leveling) as height above datum,
Date and time \(t_i\) [yyyy.mm.dd/hh:mm:ss] (clock),
Gravity reading \(g_{obs}\) [mGal] (e.g. scale units in case of the Lacoste-Romberg gravimeter).
Note that the CG-6 records all these data by itself (coordinates, elevation and time from the GPS signal), but often both coordinates and especially elevation are not accurate enough for gravity processing. Thus, these values need to be obtained from leveling.
Important: The initial setting has been done as described above, especially the date and time taken from a valid GPS signal, and setting the station cycle to numeric.
First check, if GPS is running (menu GPS). If here is an error, reboot the CG-6 by pulling both batteries out.
Next, define a new survey (menu SETTING->SURVEY). Otherwise, the last used survey is used (unfortunately, the survey name is not indicated on the screen).
When we start mapping, we define our base station. We need to memorise, which station number we use here. Go to the GPS menu, and use GET_POS to assign the current position to the station. Then start the measurement by pressing RECORD. The gravimeter starts a recording sequence based on the pre-defined parameter settings.
Move to the next station. Always assign the new GPS coordinates first by going to the GPS menu and pressing GET_POS.
Data download
Data can be downloaded from the CG-6 directly by connecting it with an USB cable to a computer. The internal disk should be visible, once you choose the USB menu.
Important! Always unmount the external device on your computer, before you pull out the USB cable.
Post processing
Important: Use GRAViMAG web interface for processing data!
The project file downloaded from the CG-6 unit can be directly imported in
GRAViMAG. See GRAViMAG\(^2\) section…You need to replace coordinates and elevation with your leveling data!
Georeferencing
The CG-6 gravimeter automatically records GPS positions with its in-build GPS. However, the elevation from the GPS unit is rather poorly determined.
We therefore need a properly levelled station position list. We record coordinates (e.g. hand-held GPS) and level the elevation differences between stations. This information is then stored and pre-processed.
Create a file with your GPS coordinates and the corresponding backward and forward views from leveling. The file should be in this format:
INFO from dummy lat        lon       elevation
BASE  421 none  51.638526  10.406761 383.66
INFO from to  lat                lon                 backward forward
DATA  421 422 51.638186266645789 10.406670151278377  7.32     13.28
DATA  421 423 51.638171933591366 10.406761597841978  7.32     23.28
DATA  421 424 51.638181824237108 10.406874166801572  7.32     34.79
INFO lines: Not needed, ignored while reading, but useful for information
BASE line: Base point, with name, and known coordinates and elevation
DATA lines: Points levelled, from and to mark the two adjacent points, lat and lon the coordinates of the to point, and backward and forward the leveling readings (in dm!).
This file can be processed with the python function
createGravityCoordElevation.py.
